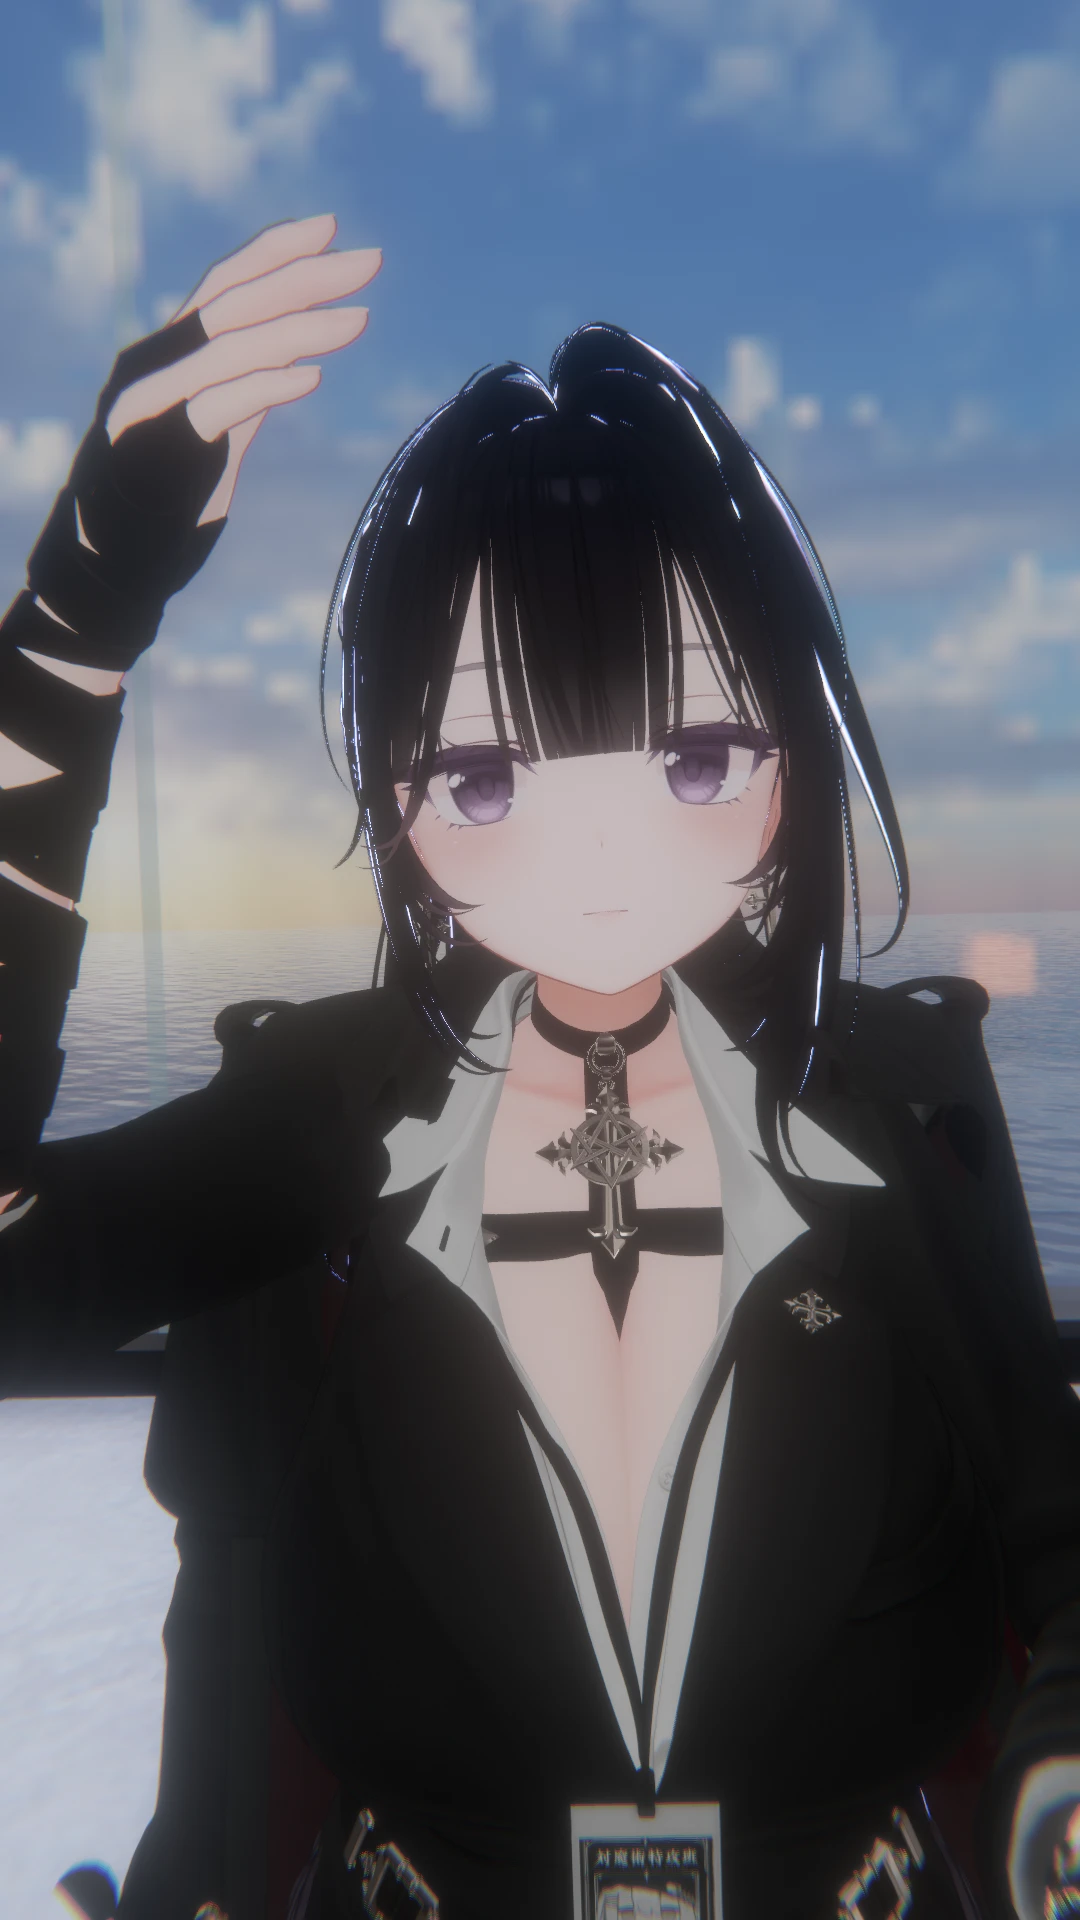
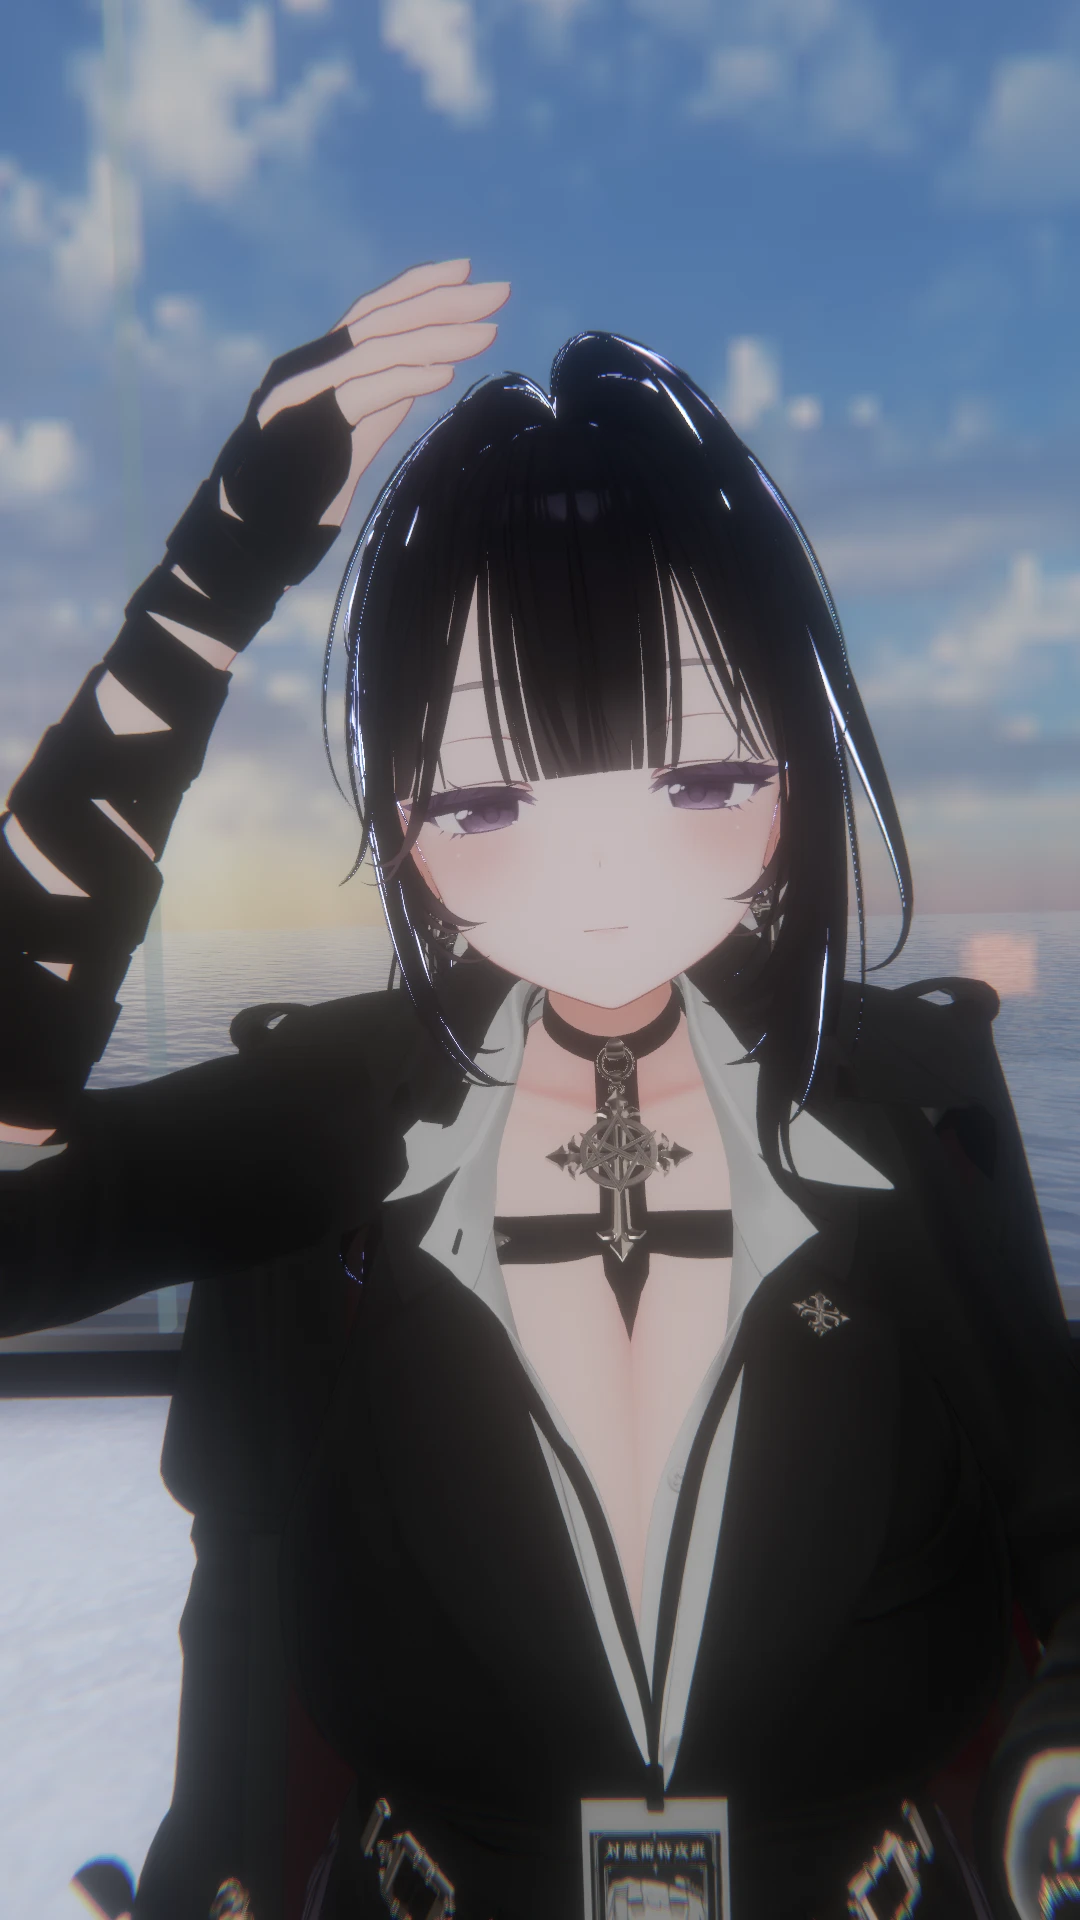
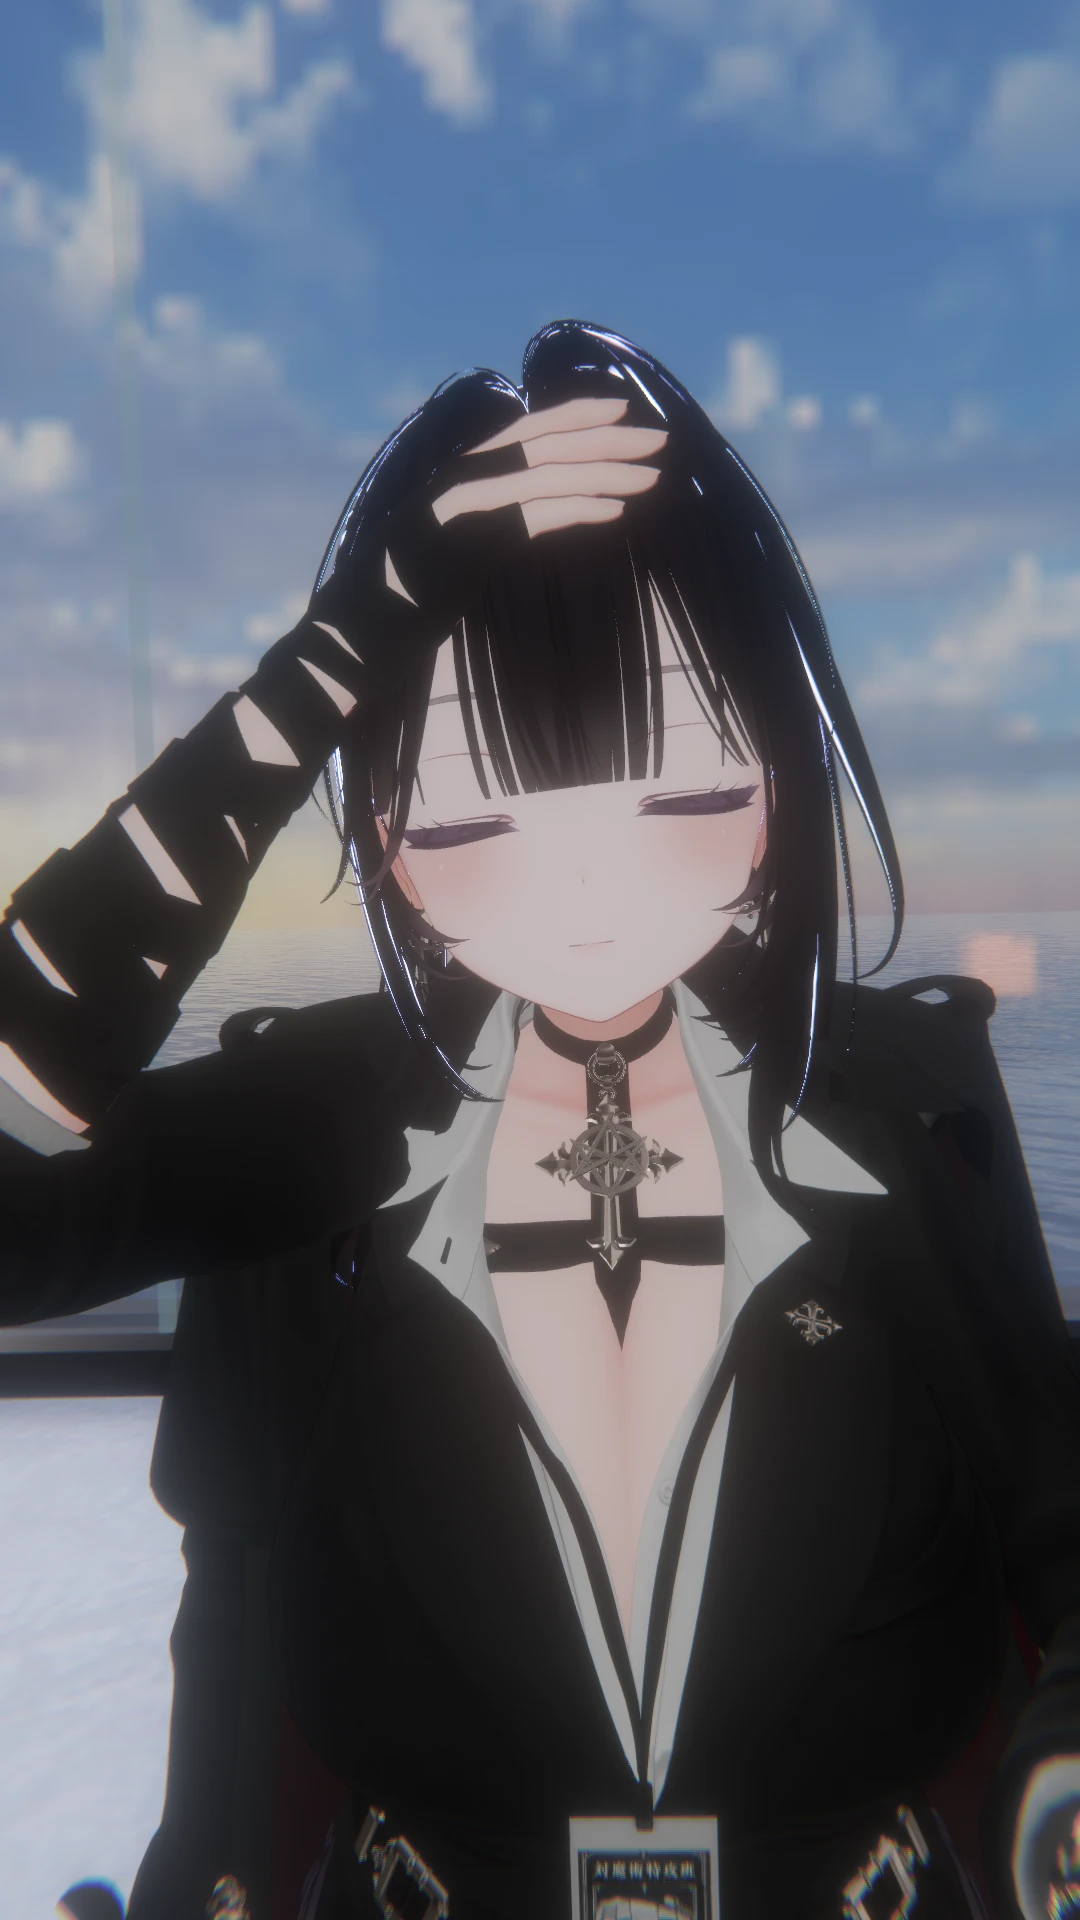
Simple_Nade_Asset.prefab을 Hierarchy의 아바타 안으로 끌어다 놓아요. 아바타를 우클릭 → Simple Nade Asset > Add to Avatar로도 넣을 수 있어요.
처음부터 "Head" 부위가 들어 있어요. 반응에 표정을 하나 고르고 그대로 업로드하면 바로 쓸 수 있어요.
Setup Outfit은 필요 없어요업로드할 때 접촉 판정·FX 레이어·메뉴·파라미터가 자동으로 만들어져요.
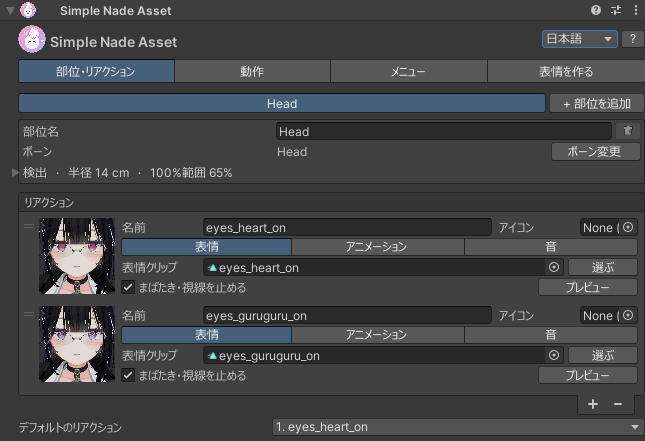
인스펙터
설정은 탭 4개로 나뉘어 있어요.
탭
할 수 있는 것
부위·반응
쓰다듬을 부위와 그 부위의 반응 (표정·애니메이션·소리)
동작
바뀌는 타이밍, 근접 가중치, 소리가 들리는 거리
메뉴
Expression 메뉴의 이름과 아이콘
표정 만들기
아바타 얼굴을 조절해서 새 표정 만들기
오른쪽 위에서 표시 언어(日本語 / 한국어 / English)를 바꿀 수 있어요. ?를 누르면 항목마다 설명이 보이고, 항목에 마우스를 올려도 설명이 나와요.
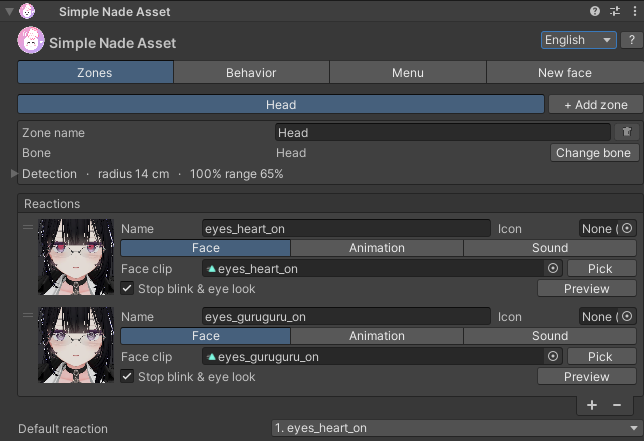
부위·반응 탭
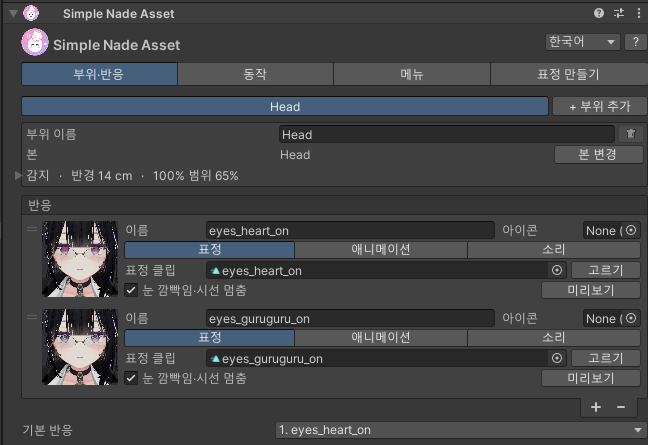
부위
위쪽 버튼이 부위 목록이에요. + 부위 추가로 본을 골라 추가해요 (최대 7개). 위쪽에는 휴머노이드 본, 맨 아래 "다른 본"에는 귀·꼬리·머리카락·의상 본이 있고 이름으로 검색할 수 있어요.
부위 이름 옆 휴지통으로 삭제하고, 본 변경으로 본을 바꿀 수 있어요.
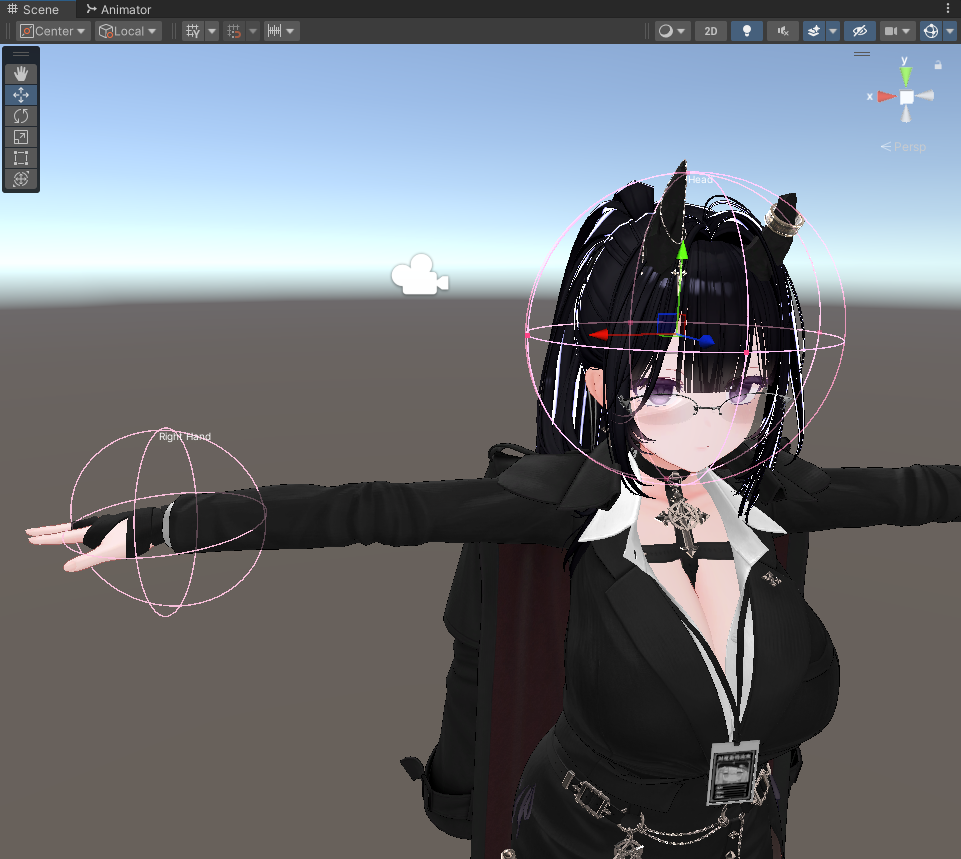
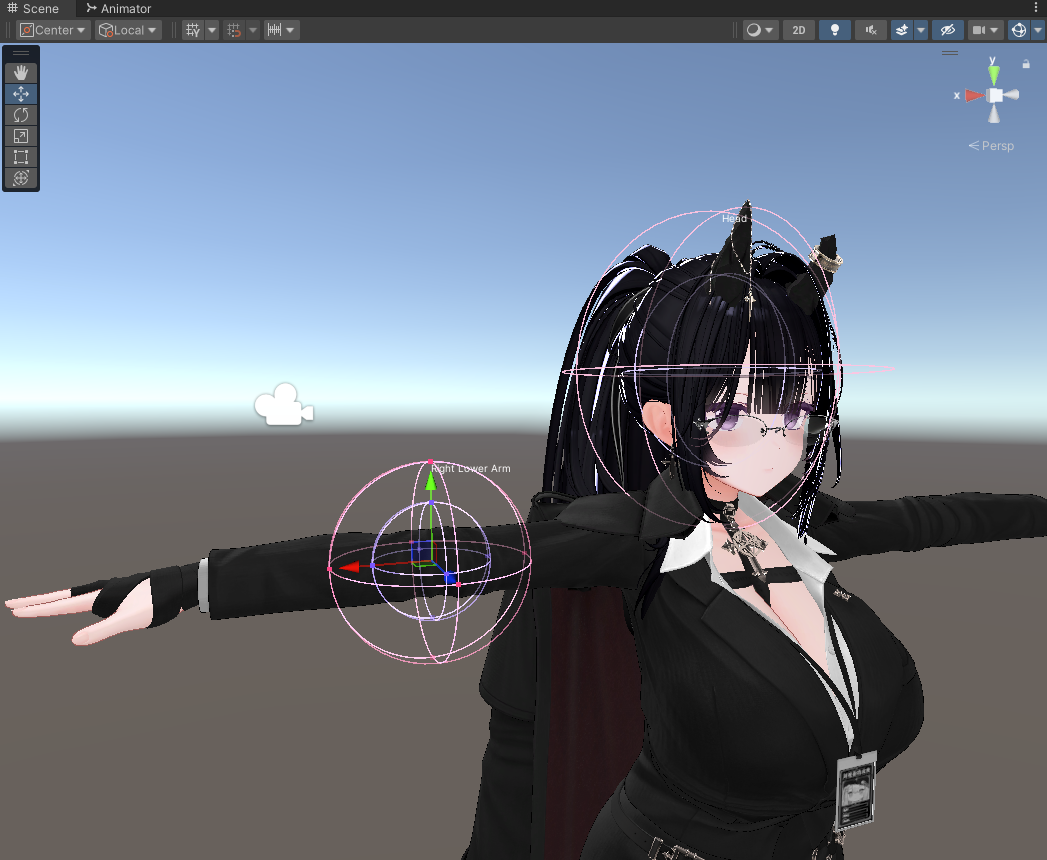
감지를 펼치면 판정 구를 조절할 수 있어요. 씬 뷰의 분홍색 구가 그 범위예요. 선택한 부위의 구는 화살표로 옮기고 테두리 점으로 크기를 바꿔요. 반경 (m)과 위치 보정 (m)은 아바타 크기 1 기준 값이에요.
손가락도 감지: 손바닥뿐 아니라 손가락 끝에도 반응해요.
내 손도 감지: 내 손으로도 반응해요. 혼자 확인할 때 편해요.
씬 뷰: 부위마다 분홍색 구가 보여요
구 크기아바타마다 머리 크기가 달라서 구는 꼭 아바타에 맞춰 주세요. 머리라면 머리카락까지 감싸는 크기를 추천해요.
반응
반응마다 표정애니메이션소리 중 쓰는 것만 켜요.
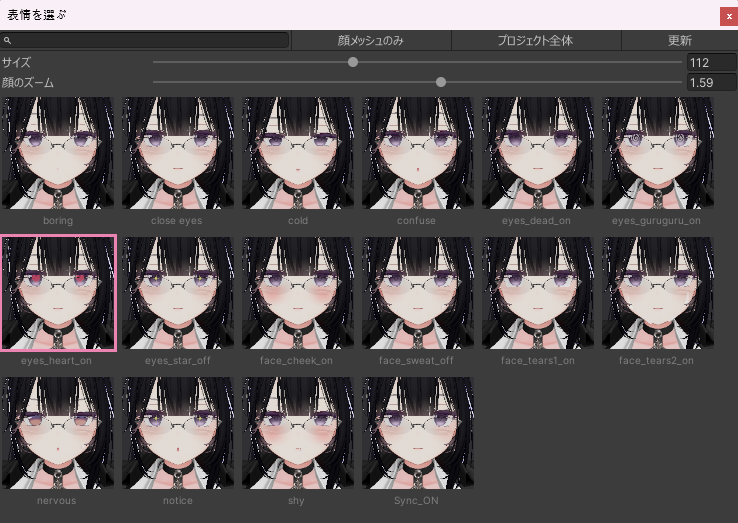
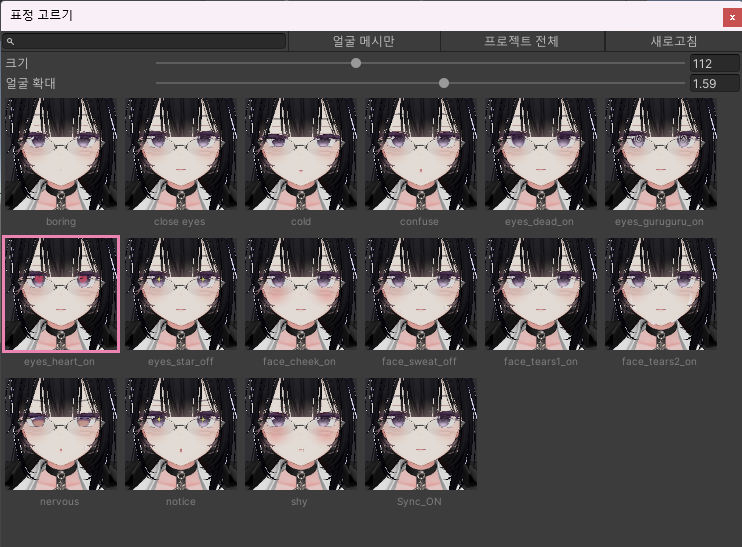
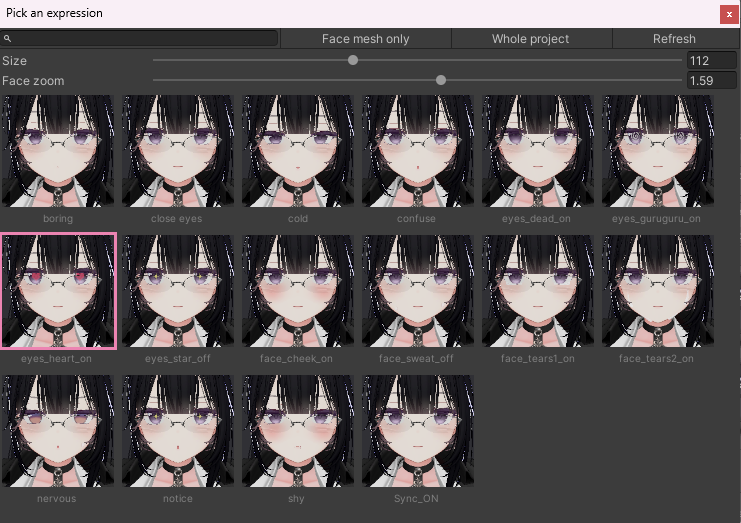
표정: 표정 클립을 넣거나, 썸네일(또는 고르기)을 눌러 얼굴을 보면서 골라요. 미리보기로 씬에서 얼굴을 확인할 수 있어요. 고르기 창 위쪽의 블렌드셰이프를 누르면 얼굴 셰이프를 하나씩 표정으로 보여 줘서, 클립이 없는 표정(눈 감고 웃는 얼굴 등)도 고를 수 있어요. 눈 깜빡임·시선 멈춤을 켜면 반응 중에는 눈 깜빡임과 시선을 멈춰서, 눈 감는 표정과 겹치지 않게 해요.
애니메이션: 표정과 함께 FX 레이어에서 재생돼요 (오브젝트 켜고 끄기, 파티클, 머티리얼, 귀·꼬리 같은 본). 휴머노이드 몸 동작은 재생되지 않아요.
소리: 여러 개 넣으면 매번 무작위로 하나가 재생돼요. 닿을 때 한 번과 닿아 있는 동안 반복 중에 고를 수 있어요. 주변 사람도 들을 수 있어요.
반응이 2개 이상이면 게임 안 메뉴에서 고를 수 있어요. 기본 반응은 처음에 선택된 상태로 시작하는 반응이에요. 메뉴에서 선택된 버튼을 다시 누르면 기본 반응으로 돌아가요.
표정 고르기 창: 아바타 얼굴 썸네일로 골라요. 얼굴이 치우쳐 보이면 그림 위를 오른쪽 버튼으로 끌어 위치를 옮길 수 있어요
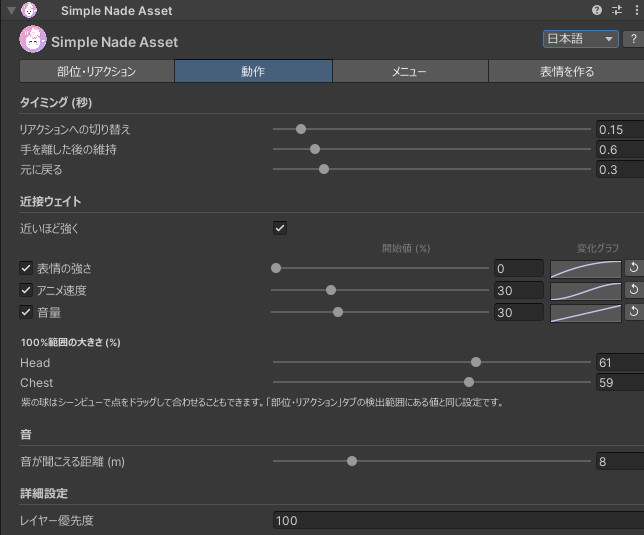
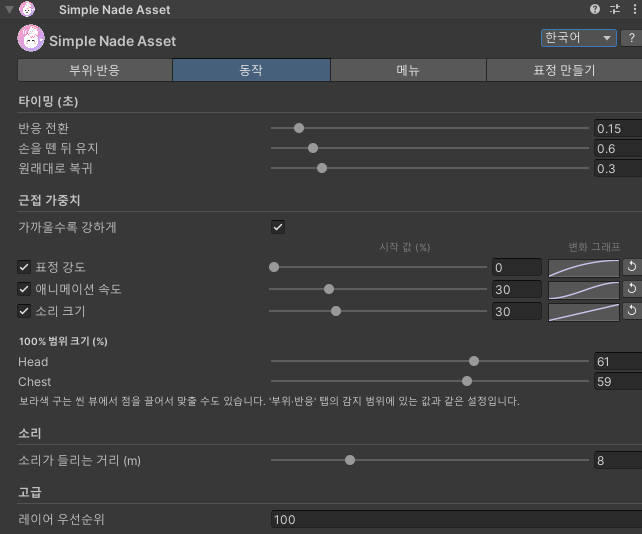
동작
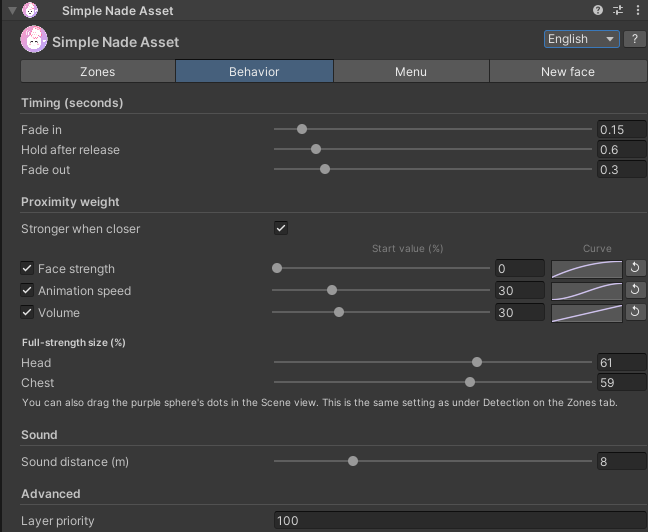
타이밍 (초)
항목
기본값
내용
반응 전환
0.15
닿은 뒤 반응 얼굴이 될 때까지
손을 뗀 뒤 유지
0.6
손을 떼도 반응을 이어가는 시간
원래대로 복귀
0.3
원래 얼굴로 돌아올 때까지
소리·고급
소리가 들리는 거리 (m): 기본 8m.
레이어 우선순위: 기본 100. 클수록 제스처 표정이나 다른 표정 기믹보다 우선해요. 보통은 그대로 두면 돼요.
근접 가중치
동작 탭의 가까울수록 강하게를 켜면, 손이 분홍색 구에 닿았을 때는 약하게 시작해서 안쪽 보라색 구에 닿으면 100%가 돼요. 원래 표정·속도·소리 크기보다 세지지는 않아요.
항목
시작 값 (기본)
보라색 구 안
표정 강도
0%
100%
애니메이션 속도
30%
원래 속도
소리 크기
30%
원래 크기
항목 고르기: 항목 앞의 체크를 끄면 그 항목은 거리와 상관없이 항상 100%예요.
간단하게: 슬라이더로 시작 값을 정해요. 그 사이는 일정하게 변해요.
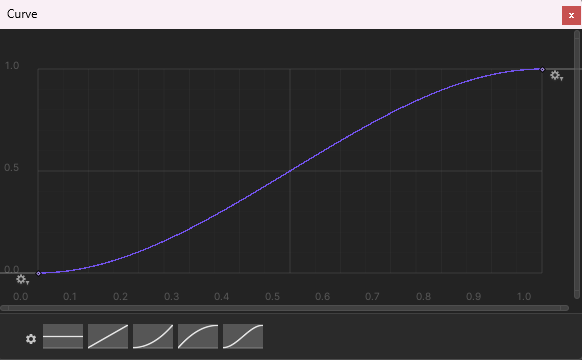
자세하게: 오른쪽 그래프를 클릭하면 변하는 모양을 직접 그릴 수 있어요 (가로: 분홍색 구 → 보라색 구, 세로: 시작 값 → 100%). ↺는 직선으로 되돌려요.
변화 구간 (cm): 분홍색 구에서 보라색 구까지의 거리예요. 부위마다 정해요 (기본 3cm). 손 판정은 머리카락 위에서 멈추니 2~4cm가 쓰다듬기에 잘 맞아요. 씬 뷰에서 보라색 구의 점을 끌어서 바꿔도 돼요.
눈동자는 한 번에: 하트 눈처럼 눈 안에서 이미지가 튀어나오는 셰이프는 자동으로 찾아서 표정 강도 50%에서 한 번에 바꿔요. 눈 감기·입·볼은 부드럽게 섞여요.
손이 닿기 시작점점 가까이쓰다듬는 중
동작 탭의 근접 가중치
그래프를 클릭하면 열리는 편집 창
바깥 분홍색 구에서 시작해서 안쪽 보라색 구에서 100%
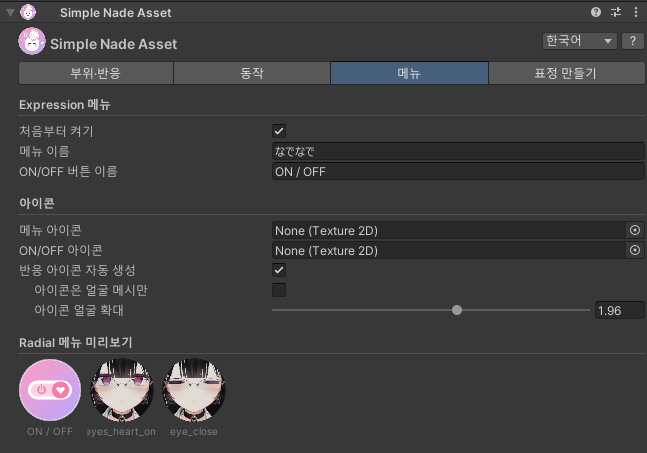
메뉴
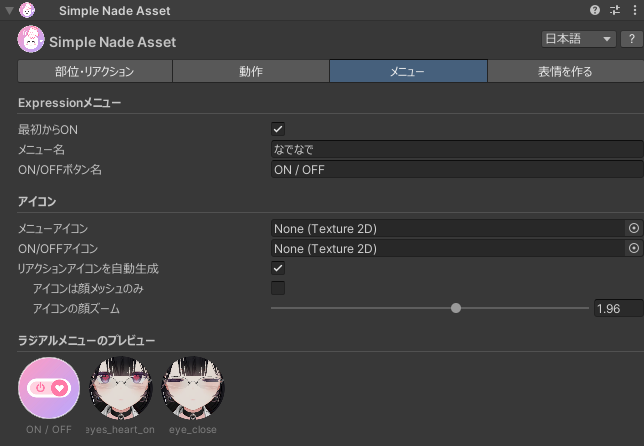
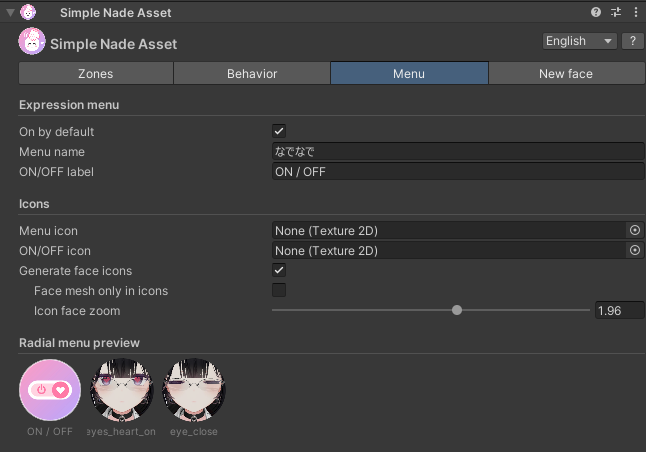
처음부터 켜기: 업로드 직후 켜진 상태로 시작할지 정해요. 게임 안에서 바꾼 상태는 저장돼요.
메뉴 이름(기본 なでなで)·ON/OFF 버튼 이름
메뉴 아이콘·ON/OFF 아이콘: 비워 두면 동봉된 아이콘을 써요.
반응 아이콘 자동 생성: 업로드할 때 각 반응의 얼굴을 찍어 아이콘으로 넣어요. 아이콘은 얼굴을 앞으로·아이콘 얼굴 확대로 찍히는 모습을 조절해요.
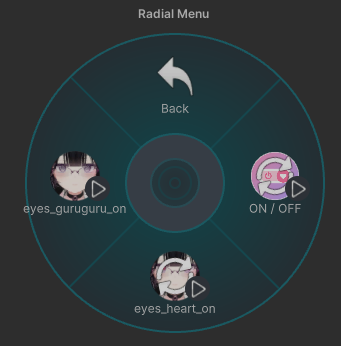
Radial 메뉴 미리보기: 첫 칸이 아바타 메뉴의 "なでなで" 버튼이고, 그다음이 열리는 페이지예요.
게임 안에서는 아바타 메뉴에 "なでなで"가 추가돼요. 안에는 전체 ON/OFF와 반응이 있고, 부위가 2개 이상이면 부위별 서브메뉴(부위 ON/OFF와 반응)가 있어요. 선택은 저장·동기화돼요.
메뉴 탭게임 안 Radial 메뉴
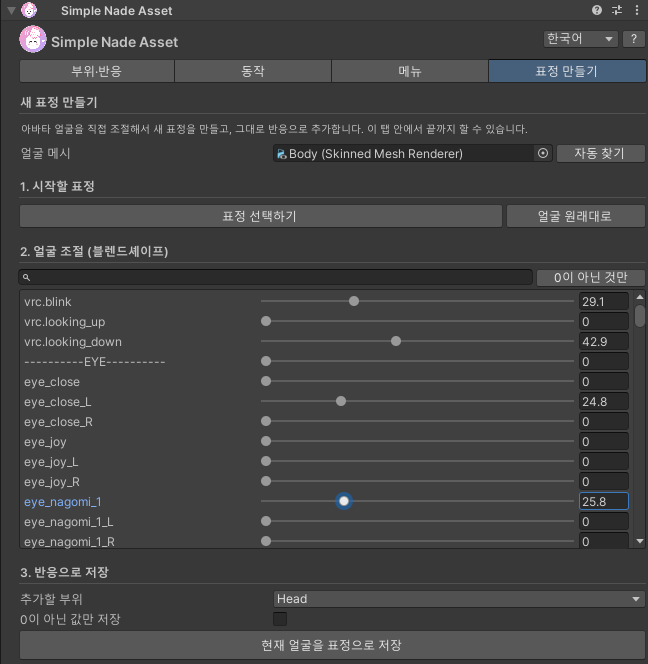
표정 만들기
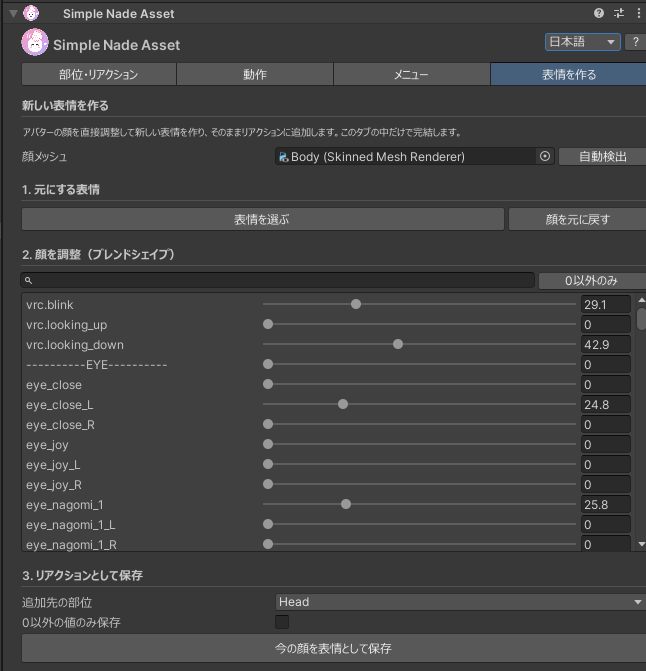
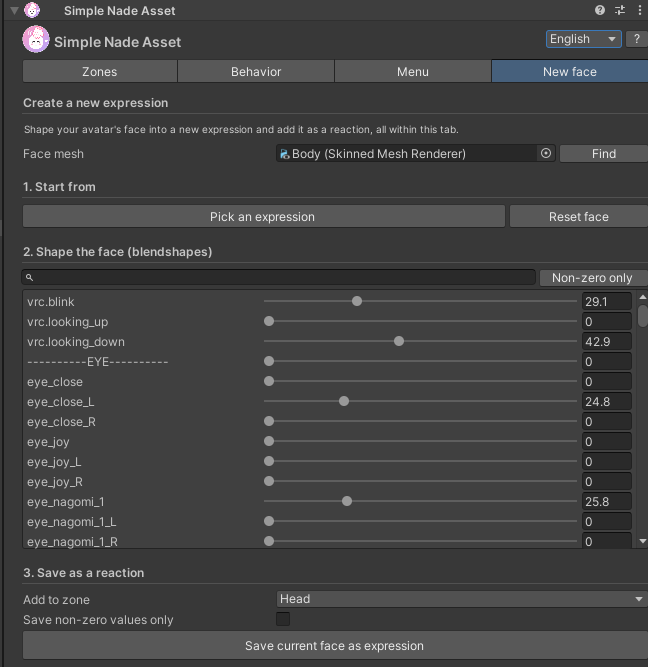
아바타에 마음에 드는 표정이 없어도, 이 탭 안에서 새 표정을 만들어 반응으로 추가할 수 있어요.
표정 선택하기로 시작할 표정을 골라요 (얼굴을 보면서 고르는 창이 열려요). 처음부터 만들려면 얼굴 원래대로.
블렌드셰이프 슬라이더로 얼굴을 조절해요. 이름으로 검색할 수 있고, 0이 아닌 것만으로 움직인 셰이프만 볼 수 있어요. 립싱크용 셰이프는 보이지 않아요.
추가할 부위를 고르고 현재 얼굴을 표정으로 저장. 클립이 Expressions 폴더에 만들어지고 반응으로 추가돼요.
추천0이 아닌 값만 저장은 꺼 두면 제스처 표정과 섞이지 않아요. 작업이 끝나면 얼굴 원래대로로 얼굴을 되돌려 주세요. Ctrl+Z로도 되돌릴 수 있어요.
표정 만들기 탭
파라미터
n은 부위 번호(0부터)예요.
이름
종류
동기화
bit
SimpleNade/On
Bool
함, 저장
1
SimpleNade/n/On
Bool
함, 저장 (부위가 2개 이상일 때)
1 / 부위
SimpleNade/n/Face
Int
함, 저장 (반응이 2개 이상인 부위)
8 / 부위
SimpleNade/n/Touch
Bool
안 함 (각 클라이언트에서 계산)
0
SimpleNade/n/Near
Float
안 함 (근접 가중치를 켰을 때만)
0
예: 머리만·반응 3종류 → 1 + 8 = 9 bit
자주 묻는 질문
프리팹을 넣은 뒤에 따로 설정할 게 있나요?
없어요. 반응에 표정을 하나 고른 다음 그대로 업로드하세요. 접촉 판정·FX 레이어·메뉴·파라미터는 업로드할 때 자동으로 만들어져요. 업로드 전에 움직임을 보고 싶으면 Gesture Manager의 Play 모드로 확인할 수 있어요.
쓰다듬어도 표정이 안 바뀌어요
분홍색 구의 위치와 크기가 아바타에 맞는지 확인해 주세요.
메뉴의 ON/OFF가 켜져 있는지 확인해 주세요.
내 손으로 확인할 때는 내 손도 감지를 켜 주세요.
반응에 표정 클립이 들어 있는지 확인해 주세요.
아주 가까이 가야 표정이 보여요
동작 탭의 변화 구간 (cm)을 작게(2~3cm) 해 주세요. 손 판정은 머리카락 위에서 멈춰서, 구간이 크면 100%까지 닿지 못해요. 표정 강도의 시작 값을 올리거나, 그래프로 처음부터 빨리 변하게 해도 좋아요.
하트 눈이 눈 안에서 반쯤 나와 보여요
눈 안에서 튀어나오는 셰이프는 표정 강도 50%에서 자동으로 한 번에 바뀌어요. 그래도 신경 쓰이면 근접 가중치의 표정 강도 체크를 끄세요. 표정은 거리와 상관없이 100%가 돼요.
제스처 표정이나 다른 표정 기믹에 덮여요
동작 탭의 레이어 우선순위를 올려 주세요.
반응 중에 눈 깜빡임이 돌아와요
눈 깜빡임·시선 멈춤을 켠 반응이 끝나면 눈 트래킹을 원래대로 되돌려요. 아바타의 제스처가 눈 트래킹을 따로 제어한다면, 제스처를 다시 바꿀 때까지 깜빡임이 돌아올 수 있어요.
Write Defaults OFF 아바타에서도 되나요?
네. Write Defaults ON / OFF 모두 동작하고, 닿지 않았을 때는 기존 표정·제스처에 영향을 주지 않아요.
동기화 파라미터 용량이 부족해요
반응이 1개뿐인 부위는 Face를 쓰지 않고, 부위가 1개뿐이면 부위별 On도 쓰지 않아요. 부위나 반응을 줄이면 bit가 줄어요.
주의사항
부위는 최대 7개, 부위마다 반응은 최대 7개까지예요 (VRChat 메뉴 한 페이지는 8칸).
한 아바타에 하나만 넣을 수 있어요.
휴머노이드(몸 동작) 애니메이션은 FX 레이어에서 재생되지 않아요.
두 부위가 동시에 닿으면 목록에서 아래쪽 부위가 우선해요.
이 상품을 사용해 생긴 문제에 대해 제작자는 책임지지 않아요.
업데이트·문의
버전
날짜
내용
1.2.1
2026/11/02
얼굴 위치를 눈 본 대신 눈 깜빡임 셰이프가 움직이는 부분(실제로 그려진 눈)으로 찾도록 개선. 표정 썸네일의 중심을 눈 바로 아래로 변경. 표정 고르기 창에서 그림 위를 오른쪽 버튼으로 끌면 얼굴 위치를 옮길 수 있게.
1.2.0
2026/11/02
표정 썸네일과 메뉴 아이콘을 눈 본 기준으로 찍어서 얼굴이 잘리지 않게 개선. "얼굴 메시만"을 "얼굴을 앞으로"로 변경 (머리카락과 옷은 그대로 보이고, 앞머리에 가린 눈이 보이게).
1.1.1
2026/11/01
표정 고르기 창에 "블렌드셰이프" 보기 추가 (클립이 없는 표정도 고를 수 있게).
1.1.0
2026/11/01
근접 가중치 추가. 인스펙터를 탭으로 정리. 표정 만들기 탭 개선 (표정 선택하기·블렌드셰이프 슬라이더). 게임 안에서 메뉴 아이콘이 안 보이던 문제 수정.
A Modular Avatar gimmick that changes your face when someone pats you. Drop the prefab into your avatar, pick a reaction and upload.
Just upload it as it is!
Put the prefab inside your avatar
Pick a face for the reaction
Upload as usual
No Setup Outfit, animator, menu or parameter setup needed. Everything is generated when you upload, and your avatar's own files are never changed.
Version1.2.1
Unity2022.3
VRChat SDKAvatars 3.10 or later
Modular Avatar1.18 or later (NDMF 1.14 or later)
AvatarHumanoid
Install
Add Modular Avatar to your project with VCC (or ALCOM).
Import Simple_Nade_Asset.unitypackage into Unity. It adds the Assets/Eukkbi_Soft/Simple_Nade_Asset folder.
Drag Simple_Nade_Asset.prefab into your avatar in the Hierarchy. You can also right-click the avatar and choose Simple Nade Asset > Add to Avatar.
A "Head" zone is already set up. Pick a face for its reaction and upload.
No Setup Outfit needed.Contacts, the FX layer, the menu and parameters are generated when you upload.
Inspector
Settings are split into four tabs.
Tab
What it does
Zones
Where you can be patted, and the reactions for each zone (face, animation, sound)
Behavior
Timing, proximity weight and sound distance
Menu
Expression menu names and icons
New face
Make a new expression from your avatar's face
Switch the language (日本語 / 한국어 / English) at the top right. Press ? to show an explanation for each setting; hovering a setting shows one too.
The Zones tab
Zones
The buttons at the top list your zones. + Add zone adds one on a bone you pick (up to 7). Humanoid bones come first; "Other bones" at the bottom has ear, tail, hair and outfit bones, searchable by name.
The bin next to the zone name removes it; Change bone picks another bone.
Open Detection to adjust the sphere, shown pink in the Scene view. Move the selected zone's sphere with the arrows and resize it with the dots on its edge. Radius (m) and Offset (m) are at avatar scale 1.
Detect fingers too: fingertips count as well as palms.
Detect my own hands: your own hands trigger it too, handy for testing alone.
Scene view: one pink sphere per zone
Sphere sizeHeads differ between avatars, so always fit the sphere to yours. For a head, cover the hair as well.
Reactions
Turn on only what each reaction needs: Face, Animation and Sound.
Face: set an expression clip, or click the thumbnail (or Pick) to choose while seeing the face. Preview shows it on the avatar in the Scene. Blendshapes at the top of the picker lists the face's shapes one by one as faces, so you can pick faces that have no clip, such as a closed-eye smile. Stop blink & eye look pauses blinking and eye tracking during the reaction so they don't fight closed-eye faces.
Animation: plays in the FX layer with the face (object toggles, particles, materials, bones such as ears and tails). Humanoid body motion doesn't play.
Sound: with several clips one is picked at random each time. Choose Once on touch or Loop while touched. People nearby hear it too.
With two or more reactions you can choose one in the in-game menu. The Default reaction is the one selected at first; pressing the selected button again in the menu goes back to it.
The picker: choose from thumbnails of your avatar's face. If the face sits off-centre, drag with the right mouse button over the pictures to move it
Behavior
Timing (seconds)
Setting
Default
What it is
Fade in
0.15
From the touch to the reaction's face
Hold after release
0.6
How long the reaction stays after the hand leaves
Fade out
0.3
Back to your usual face
Sound & advanced
Sound distance (m): 8 m by default.
Layer priority: 100 by default. Higher wins over gesture expressions and other face gimmicks. Usually leave it as is.
Proximity weight
Turn on Stronger when closer on the Behavior tab: the reaction starts weak when a hand touches the pink sphere and reaches 100% at the inner purple sphere. It never goes beyond your original face, speed and volume.
Item
Start value (default)
Inside the purple sphere
Face strength
0%
100%
Animation speed
30%
Normal speed
Volume
30%
Normal volume
Choose items: uncheck an item to keep it at 100% whatever the distance.
Simple: set the start value with the slider; it changes evenly in between.
Detailed: click the graph on the right to shape the change (horizontal: pink sphere → purple sphere, vertical: start value → 100%). ↺ resets it to a straight line.
Blend distance (cm): the distance from the pink sphere in to the purple one, set per zone (3 cm by default). Hands stop on top of the hair, so 2–4 cm suits head pats. You can also drag the purple sphere's dots in the Scene view.
Eyes switch at once: shapes that slide an image out of the eye, like heart eyes, are found automatically and switch at once at 50% face strength. Eyes closing, mouth and cheeks blend smoothly.
Hand starts to touchComing closerBeing patted
Proximity weight on the Behavior tab
The editor that opens when you click a graph
Starts at the outer pink sphere, 100% at the inner purple sphere
Menu
On by default: whether it starts switched on after upload. What you choose in-game is saved.
Menu name (なでなで by default) and ON/OFF label
Menu icon and ON/OFF icon: empty uses the bundled icons.
Generate face icons: on upload, each reaction's face is captured as its menu icon. Adjust it with Face in front in icons and Icon face zoom.
Radial menu preview: the first slot is the "なでなで" button in your avatar's menu, followed by the page it opens.
In-game, "なでなで" is added to your avatar's menu. It holds the overall ON/OFF and the reactions; with two or more zones, it holds one submenu per zone (that zone's ON/OFF and reactions). Choices are saved and synced.
The Menu tabThe in-game radial menu
New face
If your avatar has no expression you like, make a new one in this tab and add it as a reaction.
Choose a starting expression with Pick an expression (a window with face thumbnails opens), or start from scratch with Reset face.
Shape the face with the blendshape sliders. Search by name, or show only the shapes you moved with Non-zero only. Lip-sync shapes are hidden.
Choose Add to zone and press Save current face as expression. A clip is created in the Expressions folder and added as a reaction.
TipLeave Save non-zero values only off so gesture expressions don't mix in. When you're done, press Reset face to put the face back; Ctrl+Z works too.
The New face tab
Parameters
n is the zone number, from 0.
Name
Type
Sync
Bits
SimpleNade/On
Bool
Synced, saved
1
SimpleNade/n/On
Bool
Synced, saved (2+ zones)
1 / zone
SimpleNade/n/Face
Int
Synced, saved (zones with 2+ reactions)
8 / zone
SimpleNade/n/Touch
Bool
Local (computed on each client)
0
SimpleNade/n/Near
Float
Local (proximity weight only)
0
Example: head only, 3 reactions → 1 + 8 = 9 bits
FAQ
Do I need to set anything else up after adding the prefab?
No. Pick a face for a reaction and upload as it is. Contacts, the FX layer, the menu and parameters are generated on upload. To see it before uploading, use Gesture Manager in Play mode.
Patting doesn't change my face
Check that the pink sphere's position and size fit your avatar.
Check that ON/OFF is on in the menu.
To test with your own hand, turn on Detect my own hands.
Check that the reaction has a face clip.
The face only shows when the hand is very close
Lower Blend distance (cm) on the Behavior tab to 2–3 cm. Hands stop on top of the hair, so a long distance never reaches 100%. Raising the start value of Face strength, or shaping the graph to rise early, also helps.
Heart eyes look half way out of the eyes
Shapes that slide out of the eye switch at once at 50% face strength automatically. If it still bothers you, uncheck Face strength under proximity weight and the face stays at 100% whatever the distance.
Gesture expressions or other face gimmicks cover it
Raise Layer priority on the Behavior tab.
Blinking comes back during a reaction
After a reaction with Stop blink & eye look ends, eye tracking is handed back. If your avatar's gestures control eye tracking themselves, blinking may come back until you change gestures again.
Does it work with Write Defaults OFF?
Yes. It works with Write Defaults ON and OFF, and leaves your expressions and gestures alone while you're not touched.
I'm short on synced parameter memory
A zone with one reaction doesn't use Face, and a single zone doesn't use the per-zone On. Fewer zones or reactions use fewer bits.
Notes
Up to 7 zones, and up to 7 reactions per zone (a VRChat menu page holds 8 controls).
One per avatar.
Humanoid (body motion) animations don't play in the FX layer.
When two zones are touched at once, the one lower in the list wins.
The author is not responsible for any trouble caused by using this product.
Updates & contact
Version
Date
Changes
1.2.1
2026/11/02
Faces are found from what the blink shape moves (the drawn eyes) instead of the eye bones. Face thumbnails are centred just under the eyes. In the expression picker, drag with the right mouse button over the pictures to move the face.
1.2.0
2026/11/02
Face thumbnails and menu icons are framed on the eye bones, so faces are no longer cut off. "Face mesh only" is now "Face in front": the hair and outfit stay while eyes hidden by bangs show.
1.1.1
2026/11/01
Added a Blendshapes view to the expression picker, so faces without a clip can be picked too.
1.1.0
2026/11/01
Added proximity weight. Tabbed inspector. Improved New face tab (Pick an expression, blendshape sliders). Fixed the menu icon not showing in-game.